
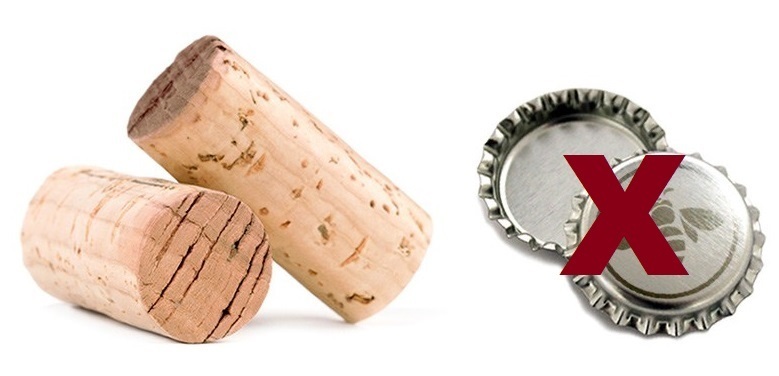
Thinking about aging your mead? If you’ve found your way to this article, we are going to assume you’ve made the very WISE decision to cork, rather than hard cap your mead. A wise choice indeed, as capping a fine mead is like topping a filet mignon with McDonald’s Special Sauce™.
Hey, we’re not trying to be snobs or anything. Bottle caps are perfectly acceptable for bubbly session meads, but that’s about it. And don’t even get me started on synthetics, or so-called “super-corks”.
Screw caps? Forgetaboutit!
Aging Your Mead? Be Classy And Cork It
Look, corking your bottle is at the very end of the long mead making journey, and all your hard work deserves a topper that reflects the quality of your brew, right? While it adds nothing to the taste (hopefully), a good cork adds some manly flair to the presentation of your bottle, and most importantly keeps the mead’s final vessel air tight (actually nearly airtight – which is a good thing – but we’ll get to that later),
So in today’s article we’ll cover all you ever need to know about corks and corking your mead, starting with: What the hell is cork anyway?
What The Hell Is Cork Anyway?
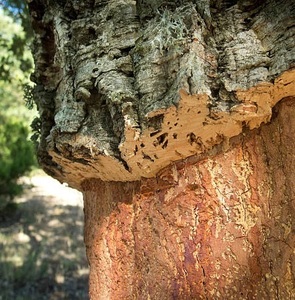
Cork comes from the phellem layer of the bark of the Cork Tree (Quercus Suber), which is the secondary, softer layer of bark just behind the hard outer layer.
Part of the Oak Genus of trees, the cork tree has develop this layer for protection from the periodic forest fires in it’s native Mediterranean habitats in Western Europe and North Africa.
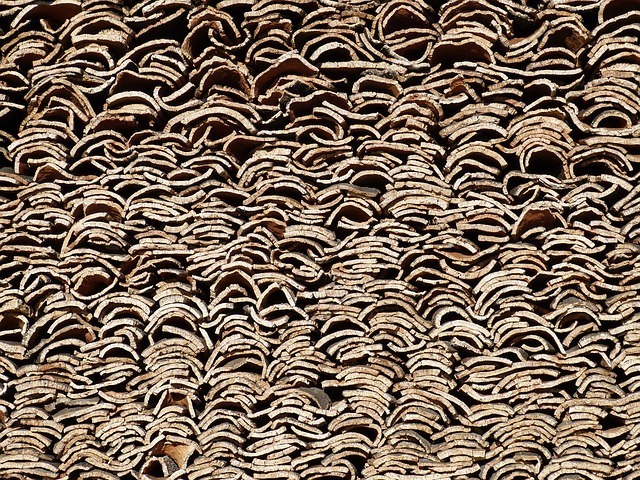
Most cork groves are harvested when the tree reaches 25 years old, and then every 9 years after that. If debarked properly, the tree is minimally affected by the removal of the bark, thus making the process sustainable.
Stripped Cork Tree Bark
While the trees do become more susceptible to fire, many of the harvested cork forests, specifically in Portugal and Spain (where around 80% of the world’s cork comes from) have matured to old-growth status, becoming a haven for plants and animals found nowhere else in the world. Most cork trees live up to 130 years, with some growing up to 300 years or more!
Why Cork Is Great For Aging
Cork’s phellem layer of bark has an elastic, yet sponge-like property which is completely permeable to liquid, but porous enough to allow a small amount of air to pass through over time.
These unique properties make it perfect for aging wines, meads and higher abv beers since this limited air transfer is actually required to gracefully age the contents over time.
Too much air can cause over-oxidation (you know the taste), and too little – or no air – limits the aging process.
How Is Cork Made
Once the cork bark has been harvested from the tree, it goes through a specific manufacturing process, whose basic steps have changed little for centuries:
1.) The cork is bundled and boiled. With the added moisture, the bundled cork bark becomes flattened and easier to work with.
2.) The cork bark is placed on a flat, dry, and clean surface for 3 to 6 month. “Clean” is the keyword here in order to limit any contamination or bacteria.
Cork Bark Drying In The Sun
3.) The cork bundles are cut into strips depending on the cork length and width requirements (they make all kinds!)
4.) The strips are sent to workers or machines that punch out the cork shapes. The scraps and byproduct are further processed into cheaper cork stoppers called Agglomerated, Colmated, or Technical Corks.
5.) The natural corks are then separated mechanically by air porosity.
6.) The corks are further separated by grades by skilled workers.
7.) The cork is vacuum sealed and prepared for shipping.
If you’re a visual learner, here’s a great video of the process as used by the Amorim Cork Company in Portugal:
Corks History as a Closure
With its classic looks and function you’d think that cork has been the topper of choice for as long as people have been drinking mead, but you would be mistaken. Before cork became the standard bottle closure, all sort of other methods were employed to top off a bottle of mead, including leather, glass beeswax, clay, and even oil-soaked cloth.
Inconsistent Containers
While cork was well-known for its sealing properties going all the way back to ancient Greece, the problem wasn’t the topper, but rather the vessels that contained the liquids.
Whether the container was clay, glass, pewter, or something else, the manufacturing processes for these containers were inconsistent, never quite allowing a uniform surface for a closure like cork to reliably seal the container. The finest bottle makers hand-made their closures with each bottle to create the best seal. As you can imagine this made bottle making very expensive, and thus available to only the richest of customers.
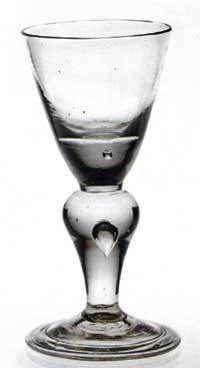
Lead Baluster Gobler Circa 1700
Making Good Glass
What mead drinkers really needed to age their fine meads, they got in the form of English businessman George Ravenscroft who perfected a method to use lead with glass making process on an industrial scale.
Lead stabilizes molten glass, allowing for a longer period to manipulate the glass, as well as the ability to form the glass over templates. All of a sudden, bottles were being produced that had consistency in the neck size.
French wine makers were some of the earliest vintners to notice that wine bottles stopped with cork had the ability to age and evolve in the bottle. As the legend goes, the French monk, Dom Perignon (c. 1670) was one of the first to discover that natural cork was superior to sealing wine with a rag. With this new discovery, the French were able to establish premier aged wines brands that have withstood the test of time.
Cork: The Topper Of Choice
Fast forward 300 years and natural cork is still used in the majority of wine closures – between 65 – 70 % of all bottles sold today. While there’s no official number for the use of cork for mead makers, we’re guessing at similar numbers since the fermentation process of mead is closely related to wine.
Cork Quality
Since natural cork stoppers come from a natural source, it’s going to have imperfections. It can also be susceptible to pathogens like bacteria and mold. When evaluating the cork quality, the Men of Mead are looking at two criteria, specifically:
1.) The air permeability
2.) The presence of contaminants (namely “trichloroanisole” or TCA)
Let’s look at each individually:
Air Permeability
Mead, just like wine, needs just the right amount of oxygen and nitrogen to age gracefully in the bottle. Too little, and the unwanted byproducts of the fermentation process, tannis, or brewing additions (sulfites) remain unprocessed. Too much and over-oxidation will occur. Both scenarios can compromise the quality of your mead in different ways.
How?
Generally-speaking, an over oxidized mead will develop a flat, ripened-fruit and / or nutty smell and taste, while anaerobic conditions (i.e. no oxygen) can impart off-colors in your mead, acrid smells, and a bitter taste.
Creating The Perfect Conditions
To create the goldilocks conditions in your bottle of mead, you’ll need to buy cork that let in just the right amount of air into the bottle each year.
What’s the ideal amount of air permeability? For a typical filled wine / mead bottle, that would be around 1 milligram of air each year. Needless to say, that’s not a lot of air.
You’re probably wondering, “How can I test a cork for 1 milligram of gas permeability through a cork?”
The answer is: You can’t. Unless you are a fancy scientist with access to a fancy laboratory.
For us non-fancy-scientists, we have to rely on test data either established by the manufacturer, or through visual grades provided by industry organizations like The Cork Quality Council (CQC).
For example, the CQC uses a visual system to grade corks into three classifications (A, B & C); the “A” classification represents “as close to the ideal cork as possible while still considering natural variation in the material”.
In other words: It’s about as good as you’re going to get.
According to thier website, Class A corks will let in about 1 mg of air at ambient temperature, while lesser cork can let in considerably more.
TCA Contamination
In the last 20 years, cork has had a heckuva time defending its stellar reputation as the topper of choice for aging fine drinks. Prior to 2000, cork was the undisputed choice as a topper, accounting for well over 95% of all wine bottled, nowadays it’s hovering around the 65-70% mark.
Why the big drop off?
Three nasty letters: T…C…A
Short for trichloroanisole, TCA is a chemical produced when naturally occurring fungus, molds, or bacteria react with chemicals called chlorophenols. Chlorophenols are found in many modern herbicides, pesticides, and cleaners and can make their way into a cork facility or winery via a number of insidious routes. Once present, these cholorphenols can be extremely difficult to remove.
In the early 2000’s, TCA contamination was such a big issue that some 5% of all wine was suspected of having cork taint. Today, thanks to a concerted industry-wide effort, that number has been reduced to around 1% of all wine sold.
Despite these improvements, the damage to corks reputation had been done, allowing competition in the form of synthetic toppers, twist-caps, and even boxes (gasp!), to become an accepted method to age wine despite their limitations.
What Does TCA Smell Like?
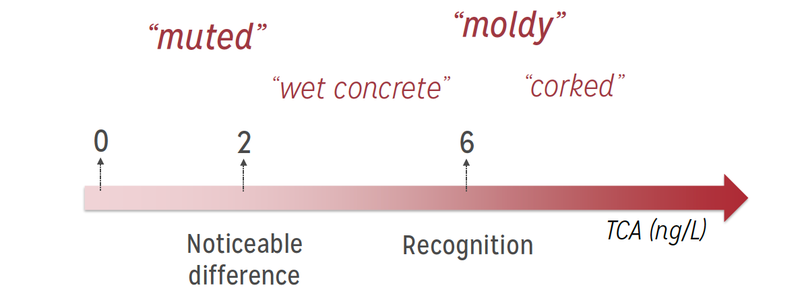
To us, a corked bottle smells a bit like when our dog decides to swim in a retention pond, and then we forget to wash the dog for a few days.
For a more scientific description, here’s a good chart we’d found online from that shows the smell profile of TCA based on contamination levels. Notice the measurement is nanograms/ Liter level. 1 nanogram = 1 billionth of a gram.
Suffice to say, TCA is an extremely potent smell!
Using Clean Corks
With all the concern about contamination, many home-brewers swear by boiling their corks to provide some perceived extra sanitation. We don’t do it, and we recommend against the practice. Boiling won’t sanitize the cork any more than what the cork manufacturer has done, and it can actually weaken the cork at the cellular level.
To ensure the cleanest corks:
- Keep them in the manufactured seal container as long as possible. If you have any left over after the bag has been opened, store the rest in vacuumed sealed bags once they’ve been opened.
- Buy from a reputable manufacturer. Home brewers can have a tough time finding quality cork since we don’t command the volumes of major manufacturers. We’ve had success with an e-commerce company called WidgetCo. Headquartered in Houston, they deal directly with high quality cork producers in Portugal.
Buying Cork For Your Mead
You can buy cork just about anywhere online, or at your local brewer’s outfitter, and range in price from a few cents per plug all the way up to a couple of dollars USD. They come in a surprising wide proliferation of styles, shapes, grades.
So which one is right for you?
Define Your Needs
Despite all our snobbery with using cork, finding the right closure really depends on you’re looking for. If you’re looking to pop open your mead shortly after bottling it, go ahead and use a twist-on cap, or some less expensive cork. However for those aiming to age their mead for a year or more, we suggest spending a little more for quality cork stoppers from a reputable buyer.
Sizing Considerations
Most home mead brewers use standard sized wine bottles to contain their mead. If you plan on doing the same, you’ll want to buy straight cork topper in size #9. We’ve found the #8 to be too loose while #10 is way too tight. As a rule of thumb, the longer the cork, the longer your mead will last, so we recommend that you use a 1-½” to 1-¾” cork, which is more than sufficient to keep your mead for more than 18 months.
Where To Buy
There’s plenty of manufacturers out there, but as mentioned previously we’ve had success with a company called WidgetCo. Here’s the Amazon link for their “flor” #9 cork. This is their highest end cork, and a great choice if you’re planning on aging more than 4 years.
For aging mead between 2-4 years, save yourself some money and get their WIDGETCO 1+1 Wine Cork, A Grade cork package.
FYI – we do collect a small referral fee from Amazon if you purchase through these links. We’ve used everything we recommend and the purchase will be at no cost to you.
Corking Your Mead
I love corking day! It’s the summation of all the hard work you’ve put into your mead. Hopefully it should be a quick, painless, and triumphant operation. However, unless you’ve the strength of Odin, you can’t just plunge the cork into your bottle with your thumb. Corking your mead takes a little mechanical assistance, which you’ll get in the form a corker.
While there’s a bunch of styles of corker on the market today, they all fit into two main categories; hand corkers and floor / bench corkers. Let’s take a look at each:
Hand Corkers:
Hand corkers are going to be less expensive than floor corkers, and take a little more finesse, practice, and effort to use properly. Hand corkers are a good economical choice for the mead maker planning to produce less than 5 gallons (~25 bottles) of mead a year. They do take a bit to get used to, so don’t get frustrated if you end up with a couple of broken bottles or a cork sticking halfway in the neck while you learn the nuances of the tool.
Soaking Your Cork
Because of the limited torque that hand corkers provide, you’ll need to use some kind of lubrication to get the cork seated in the bottle correctly. This is especially true for the tighter #9 corks we recommend using.
For this, we take notes from mead-maestro Ken Schramm, author of the seminal mead book “The Compleat Mead Maker” who recommends soaking your corks in a gallon of water treated with 2 campdem tablets and a few drops of food-grade Glycerin.
 | Plunger Corker: The cheapest of the lot, plastic plunger corkers use brute force, and no mechanical leverage to get the cork in the bottle. You'll definitely need another person to stabilize the bottle, while another uses their body weight or a rubber mallet to get the cork in the bottle. We strongly suggest only using a plunger for #8 corks or smaller for a standard wine bottle. #9 cork and up are simply too tight to use plungers in our experience. Also, as prescribed above, make sure to soak your corks beforehand.  | ||
 | Metal Double Lever Corker: For a few more bucks, get yourself some leverage and buy a Double-Level Corker. With the additional torque, you can use the #9 corks we recommend. It takes some practice to center the plunger and you should do a cork soak. | ||
 | Gilda Compression Hand Corker: For a hand-corker, the Gilda corker is closest to the floor-corker in how it operators. It's a two-phase operation; first phase compresses the cork when you pull the red handles together. Second phase plunges the compressed cork into the bottle. Most come with an adjustment for cork depth. Now while it might get you some better force in the cork application, it's still a bit unstable, so we still recommend you use another person to stabilize the bottle during the 2nd phase. | ||
Floor & Bench Corkers
Floor / table corkers are far and away the easiest to operate, provide the most leverage, and let you get away comfortably with a one-person operation. What we like best is that we don’t have to soak or steam our corks. Recommended for anyone making 10 gallons (~50 bottles) or more mead per year.
NOTE: Floor corkers should be engaged quickly. If you pull the levers too slowly, the cork will uncompress too soon, leaving a bit of the cork sticking out of the bottle.
 | Portuguese Floor Corker: A great value for the price, to use simply place your cork on the top compression area and center the plunger, then place your bottle on the black base. Finally pull the lever quickly and, viola! It's not super tall, so be prepared to kneel a bit when corking. Most include mounting holes on the base, and I've heard of folks bolting these to a table, but then it might be TOO big for an averaged height human to pull the lever. | ||
 | Italian Floor Corker: A larger version of the "Portuguese" floor corker, the Italian model is taller and provides more leverage on the handle. Definitely easier on the back, however you still have to bend over a bit to place the bottle and cork in the fixture. | ||
 | Bench Corkers: Our favorite ergonomically-preferred corker, it's great for mounting on a workbench or table. While it is the most expensive of the lot, it's a must for us if we're doing 50 or more bottles at a time. Saves us space and save our back from being hunched over a smaller floor corker the entire time. Ours has mounting holes to stabilize the fixture to the table and an adjustment to set depth. | ||
Conclusion
Well there have it, we sincerely hope that you enjoyed reading it as much as we enjoyed writing it.
If we've missed anything, or you have any questions, please leave a comment, we'd certainly be glad to hear from you!
